


I have great news everyone. I have finally come across a great HTML and CSS teacher for you! If you're like me, you've been teaching yourself the hard way, searching through lots of questionable sites sorting through all the out-of-date code. Its so frustrating and practically impossible to learn how to design websites that way, whether its to save money and design your own site or to become a blog designer and make money designing for others. The level of difficulty to find quality information is actually why I moved to another blogging subject, which I now love and intend to stay on. But for all the others who want to get in on the elusive designing club, this teacher is a great way to go.
His name is Robert. You can reach him at idahosixstring@hotmail.com. I was just blown away with some of the stuff he's done and built. I've seen a site he completely WROTE FROM SCRATCH. No copy and paste, he actually typed out all the code. I've been thinking of moving my site to another host and getting a domain and he was showing me ways to get great asp hosting and a good site, making it all look super easy; which is what I'm all for of course.
Even if you just want to learn something simple like changing your fonts, correctly adding a third column to your blog, and stuff like that, he can teach you how to do it the right way. Plus, I knew he was for you all when he told me his prices are COMPLETELY NEGOTIABLE! Woohoo. His schedule will likely fill up fast, so if your interested I'd e-mail him soon. idahosixstring@hotmail.com He's also working on building his own game engine. He does advanced stuff. But he can still explain how to do the simple things in an easy way. I've learned that sometimes its ok to have a little help :-)
Showing posts with label Guest Tutorials. Show all posts
Showing posts with label Guest Tutorials. Show all posts
Monday, May 10, 2010
Monday, February 8, 2010
Because I Totaly Wish I Could Make Cards Like This!
I found a link to KWerner Design today and can't believe how Awsome it is. I really want to be able to make cards like these because I send out a lot of cards on holidays.


I saw this card and think it amazing. And she has a whole video tutorial on how to make it! Check it out here. Maybe my dreams of becoming a fabulous card maker aren't as far away as I thought... :-)
Friday, February 5, 2010
Vintage Flower Ruffle Headband
Linds from over at That's So Cuegly made an absolutely adorable Vintage Ivory Headband with Ruffles that I absolutely loved!! She being extremely generous and gracious, allowed me to feature her tutorial and share it with all of you. Check it out, its so darn cute! She does a great job.


By Linds at That's So Cuegly!
http://cuegly.blogspot.com/
Want to make one?...

What if we include some RUFFLES?

That's what I thought.

(I bought a bed skirt at a yard sale for a quarter because I loved the fabric. So I cut it up).
I cut pedal shapes, no rhythm or reason as you can clearly see below. I literally hacked away at it.
Hot glued the centers (very very lightly or your center will get too stiff to shape. You could sew, but I'm ALL about no-sew, even if it intels glue burns.)

I did the same thing to an ivory colored lace that I had.
And glued 5 more pedals on top.
And glued 5 more pedals on top.

I placed a bead in the center and put the thinnest ring of hot glue around the whole base of the bead. Like so...

Then start pinching. I ended up shaping and pinching with both hands to give the flower a shape

Then put a tinsy dot of glue for the stragly back pedals.

Isn't she lovely?

She goes GREAT with ANY UPDO!
Then I got to thinking...What if I made a smaller version for a headband?
like so...


(I just cut out a circle of lace about the size of my palm and then pinched it all up with glue) and THEN added the pearls.


But it was missing something...
something...frilly.
something...feminine.
something...ruffely.

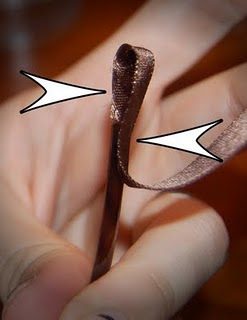
I grabbed a shiny brown 1/2" ribbon and glued it on the edge of the headband. I glued it first on the inside of the headband and wrapped it around the edge and glued it on the otherside. This is on the opposite side of the headband that the flowers are on.
*****
Then we start loop-de-looing...
*****
Then we start loop-de-looing...
The arrows indicate where to put the glue. Put it lower than you think so that you can adjust the loop to the size you want. You'll understand once you start.

(sorry about chipped nail polish...a couple posts ago I noticed I REALLY needed to color my hair, so I did it the next day...now I'm going to go give myself a manicure...)

Just keep going...Just keep going...

I stopped once I got to the flowers and didn't do the other end.

WALAH...


HAPPY HOLIDAYS

By Linds at That's So Cuegly!
http://cuegly.blogspot.com/
Subscribe to:
Posts (Atom)


